Managing Reflections on Glass, Mirrors and Shiny Surfaces
In a 360° shoot, the equipment reflects in every surface. Where should the tripod go, and which angle moves the reflection out of sight? A guide to the difficult spaces that make up 32% of our archive.

Use the buttons below to get an AI summary of this article.
Managing Reflections on Glass, Mirrors and Shiny Surfaces
In normal photography you manage reflections through framing: you change the angle and leave the reflection outside the frame.
In 360° photography that option does not exist. The equipment and the operator show up somewhere in every reflective surface in the space. The question is not "will there be a reflection" but "where will the reflection fall".
Why reflections are a bigger problem in 360°
There are three reasons.
There is no escape. Because the scene looks in every direction, you cannot frame a reflective surface out.
The operator shows up too. Whoever stands next to the tripod appears in the glass or mirror opposite. The only way to prevent this is for the operator to stand, for every frame, at a spot where the reflection does not fall. That has to be planned when the scene point is chosen.
Reflections break the overlap zone. This is the most technical one: during stitching, the software looks for shared details between neighboring frames. On a reflective surface each frame sees a different reflection, so the detail to be matched changes from frame to frame. The result is a stitching error.
Three types of reflection
The reflections you meet on site are not all the same, and they need different methods.
Mirror reflections. Sharp and complete. A mirror shows everything in front of it exactly as it is. Gyms, beauty salons and stores with fitting rooms fall into this group.
Glass reflections. Semi-transparent. The object behind the glass and the reflection in front of it overlap. Shop windows, glass facades and display cabinets behave this way.
Shiny surface reflections. Diffuse and soft. Polished floors, stainless steel appliances, car paint and marble countertops belong to this group. They do not produce a sharp image, but they do create glare spots.
The first two are managed through positioning, and the third largely through lighting.

Positioning rules that reduce reflections
The four core rules that work on site are summarized above. Here is the logic behind them:
Breaking the angle is the most effective rule. When you look straight at a surface, the reflection lands in its center and is at its most visible. A 20–30 degree offset pushes the reflection to the edge of the surface.
Increasing the distance shrinks the reflection. A tripod close to the surface reflects large and sharp; step back two meters and it becomes both smaller and blurrier.
Setting up at the end of the line works especially well in store and showroom layouts. Directly facing a product line is the worst spot; looking in at an angle from the end of the line moves the reflection off the product surfaces.
Turning on all the lights is decisive on shiny surfaces. A surface lit by spotlights produces sharp glare spots; when the light is evenly spread, those spots disappear. In this sense, lighting and reflection management are two sides of the same job.
What to do in mirrored spaces
A mirror is the one case where reflections cannot be prevented entirely. In a gym an entire wall can be mirrored, and the equipment appears in every scene that faces that wall.
Here the goal changes: not to eliminate the reflection, but to keep it from standing out.
The approaches we use:
- The scene point is set up at least two meters away from the mirror; a distant tripod becomes a small, unremarkable object in the mirror
- The tripod is positioned at an angle to the mirror rather than parallel to it
- The operator stands at a spot outside the mirror's angle
- No scene point is placed directly opposite the mirror; visitors will pass through there anyway as they explore
You also have to accept this: a gym tour in which the mirrors never appear would not look realistic. Visitors know it is a photo shoot, and seeing a small tripod in a mirror does not bother them. What bothers them is a large reflection in the middle of the frame.
Shop windows and glass facades
In an exterior scene, glass causes a two-way problem: from inside it shows the street, from outside it shows the interior, and the two overlap.
Practical solutions:
- Break the angle. An exterior scene that looks straight at the glass carries the building opposite and the street into the shop window. A 20–30 degree offset largely solves this.
- Pick the time. The hours when that facade gets no direct sun are when glass reflections are weakest.
- Turn on the window lighting. If the inside is brighter than the outside, the reflection weakens and the window display becomes visible. That is why window lights are kept on even during the day.
- Clean the glass. Dirty glass scatters the reflection and creates a blurry layer.
In industries where the shop window carries the brand identity, such as clothing stores, this scene is one of the most important frames in the tour.
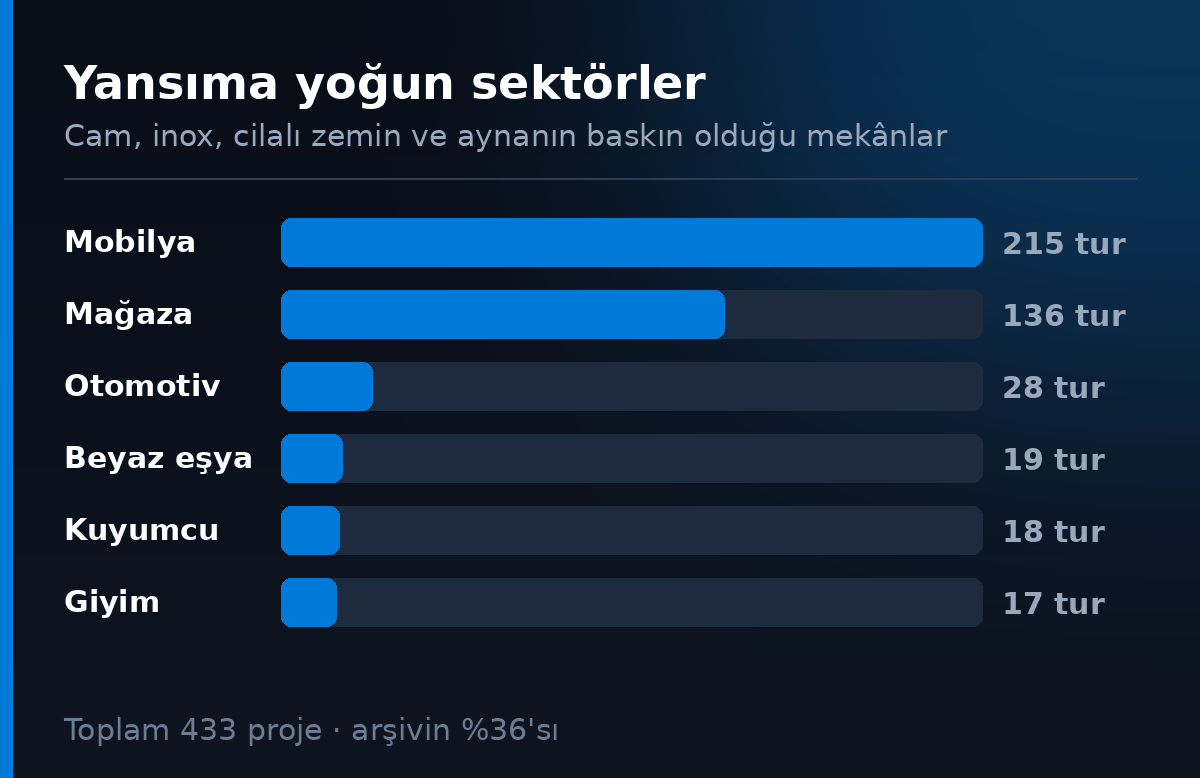
From our archive: reflection-heavy industries
When we split the 1,600+ businesses in the G360 archive by surface type, 487 projects (32%) fall into the reflection-heavy group: furniture stores (183), retail stores (125), automotive (40), home appliances (90), jewelers (28) and clothing (21).
In other words, a third of the archive consists of spaces dominated by glass, mirrors, stainless steel or polished floors. That is above the industry average, and the reason is easy to see: reflective surfaces usually come with product displays, and businesses with displays are the group that benefits most from a virtual tour.
The practical takeaway: in these industries, the shoot requires scene points to be planned in advance. Walking into the space and shooting from random spots produces scenes that are unusable because of reflections.
The full industry breakdown is in the Turkey data report.
What can be fixed in post-processing
Some reflections can be removed afterwards, but the limits are clear.
What can be fixed: small glare spots confined to a single point, equipment traces in the nadir area, and slight tone differences on glass.
What cannot be fixed: a sharp reflection of the equipment in a mirror, the building opposite showing in a shop window, and a large reflection across a product surface.
"Recreating" these is technically possible, but because the real image behind them is unknown, the result is made up. The right approach is to solve the problem during the shoot.
Summary
In 360° photography reflections cannot be prevented, only redirected. Four rules handle most of the job: break the angle, increase the distance, set up at the end of the line, turn on all the lights.
In mirrored spaces the goal is to shrink the reflection rather than eliminate it; for shop windows, the time of day and interior lighting are decisive.
If you are in a reflection-heavy industry, such as furniture, automotive, home appliances or jewelry, it makes sense to ask whether the scene plan is prepared in advance when you request a quote. We have listed the other questions to ask in our guide to choosing a provider.
Frequently Asked Questions
No. Because the scene looks in every direction, the equipment shows up somewhere in the reflective surfaces of the space. The goal is not to eliminate the reflection but to steer it somewhere it does not stand out.
Look at the surface at a 20–30 degree angle rather than straight on, keep at least two meters from the surface, set up at an angle from the end of a product line instead of directly facing it, and turn on all the lights instead of spotlights so the light is evenly spread.
The scene point is set up at least two meters from the mirror and at an angle, the operator stands outside the mirror's angle, and no scene is placed directly opposite the mirror. A gym tour in which the mirrors never appear would not look realistic anyway.
Look at the glass at an angle rather than straight on, choose a time when the facade gets no direct sun, keep the window lighting on during the day and clean the glass before the shoot. When the inside is brighter than the outside, the reflection weakens.
The software matches neighboring frames by looking for shared details. On a reflective surface each frame sees a different reflection, so the detail to be matched changes from frame to frame and a stitching error appears.
Small glare spots, equipment traces in the nadir area and slight tone differences on glass can be fixed. A sharp reflection of the equipment in a mirror, the building opposite showing in a shop window and a large reflection across a product surface cannot.
Furniture, retail stores, automotive, home appliances, jewelers and clothing. 487 (32%) of the 1,600+ businesses in the G360 archive fall into this group; glass, mirrors, stainless steel or polished floors dominate in all of them.
Ask whether the scene points are planned in advance. In reflection-heavy spaces, shooting from random spots produces unusable scenes. Looking at the shiny surfaces and mirrors in a sample tour also gives you a quick idea.
A Professional Virtual Tour for Your Business
Give your customers an unforgettable experience with a 360° virtual tour.
Get a Free Quote